-3.png?width=150&height=101&name=Kiwi-voip-2%20(1)-3.png)
The Register Method allows your SIP PBX to connect to Kiwi VoIP using standard SIP registration with a pilot number. It’s ideal when you don’t have a static IP, or when you prefer traditional username/password-based authentication.
🧭 Two Setup Options Available
Choose the best configuration for your setup:
1️⃣ Account-Level Register Trunk
📌 One pilot number authenticates all numbers on your account.
2️⃣ Line-Level Register Trunks
📌 Register and manage each number individually for more granular control.
🔧 Account-Level Register Trunk Setup
-
Log in to 👉 https://portal.kiwivoip.co.nz
-
Go to Cloud PBX
-
Select the Pilot Number
-
Navigate to Preferences > Register Trunking

-
Tick ✅ Enable register trunking on this account (make this number the pilot)
-
Click Save
📌 Once enabled, all voice numbers on the account will route via the registered pilot.
⚙️ Optional Settings
-
Preserve DDI Information:
Retains the original dialed number in SIP headers — only use if your PBX supports multiple DDIs on a single registration. -
Enable Outbound Trunking on This Line:
Allows you to present any DDI on the account as caller ID without registering each number separately. Useful for businesses with multiple departments/DDIs.
📝 Note: Removing the pilot number will deactivate the trunk. You'll need to reconfigure the logic for any numbers remaining on the account.
🔧 Line-Level Register Trunk Setup
For when you want to mix registration and routing across lines.
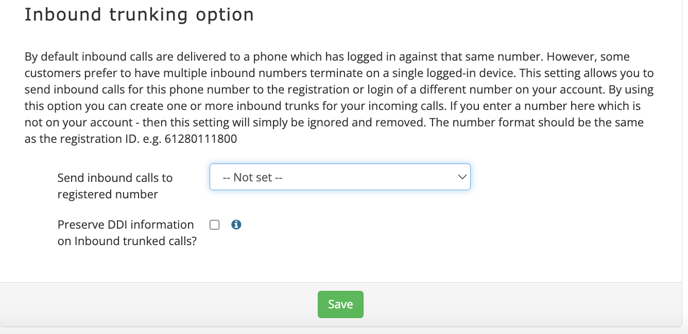
Step 1: Inbound Trunking Setup
-
Go to Cloud PBX > Inbound Calls > Call Forwarding or Trunking
-
Select the DDI you want to trunk
-
Choose the Pilot Number from the dropdown
-
Tick ✅ Preserve DDI information on Inbound trunked calls (optional)
-
Click Save
Step 2: Outbound Trunking Setup
-
Select the Pilot Number in Cloud PBX
-
Go to Outbound Calls > Outbound Trunking
-
Tick ✅ Enable outbound trunking
-
Click Save
📤 Caller ID Presentation Options
-
Display Name:
On most IP phones, softphones, and Asterisk-based PBXs, you can change the name part incallerid=or useCALLERID(name)in the dial plan to define the presented number. -
P-Asserted-Identity (RFC 3325):
Advanced users can use this SIP header to present an alternate caller ID — supported by many modern PBX systems.
🧠 Pro Tip: After enabling outbound trunking, you can dynamically present any number on your account as your outbound caller ID — as long as your PBX sends the correct SIP headers.